Previously, I summarized the steps to install Hadoop in a single node Windows machine.
In this page, I am going to document the steps to setup Hadoop in a cluster. The architecture looks like the following diagram:
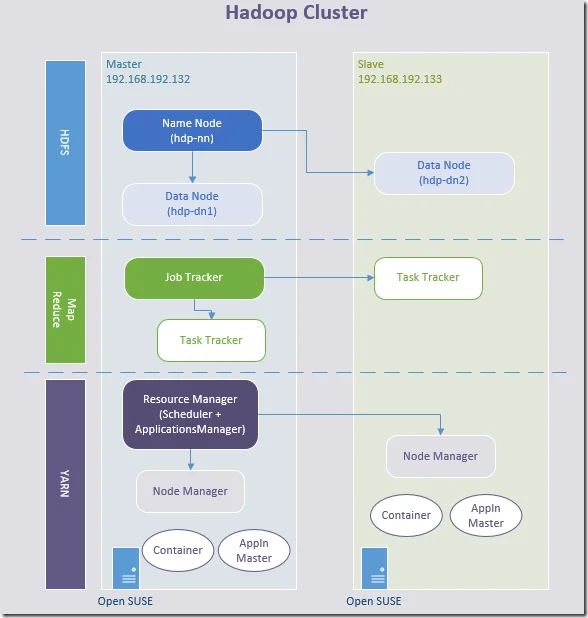
* Since Hadoop 2.x, Job Tracker is deprecated and replaced by Resource Manager/Application Master in MRv2; Task Tracker is deprecated and replaced by Node Manager in MRv2.
* Application master is the main container requesting, launching and monitoring application specific resources.
* The MapReduce framework consists of a single master ResourceManager, one worker NodeManager per cluster-node, and MRAppMaster(Applicaiton Master) per application.
Prerequisites
Infrastructures
- Two open SUSE servers or VMs.
- Network (LAN/NAT)
Hadoop 3.1.0 binary
Access to the following link is required to download Hadoop binary:
I am going to use the current latest version 3.1.0 for this exercise.
References
Official cluster setup guide is available in the following link:
http://hadoop.apache.org/docs/r3.1.0/hadoop-project-dist/hadoop-common/ClusterSetup.html
Step-by-step guide
Network configuration
Edit /etc/hosts in both servers to add the following configurations:
192.168.192.132 hdp-master 192.168.192.133 hdp-slave-1
Make sure the two servers can connect to each other.
ping hdp-master
ping hdp-slave-1
The ping should be successful from both side.
Setup Java
By default, SUSE already includes a JAVA JDK. If it is not available in your machines, please download from the internet (Refer to Install Hadoop 3.0.0 in Windows (Single Node)).
Create a new system user
Use the following command line in both servers to create a new account named hadoop:
tangf@192-168-192-133:
> sudo useradd -m hadoop [sudo] password for root: tangf@192-168-192-133:> sudo passwd hadoop New password: BAD PASSWORD: it is based on a dictionary word BAD PASSWORD: is too simple Retype new password: passwd: password updated successfullytangf@192-168-192-132:
> sudo useradd -m hadoop [sudo] password for root: tangf@192-168-192-132:> sudo passwd hadoop New password: BAD PASSWORD: it is based on a dictionary word BAD PASSWORD: is too simple Retype new password: passwd: password updated successfully
In my case, I am using hadoop as password too.
Configure ssh
Enable ssh
Use the following command to enable ssh port in both servers:
sudo vi /etc/ssh/sshd_config
Make sure the following settings are enabled:
Port 22 #AddressFamily any ListenAddress 0.0.0.0 ListenAddress ::
PubkeyAuthentication yes
The above configuration use port number 22.
Use the following command to edit file /etc/ssh/ssh_config
sudo vi /etc/ssh/ssh_config
Make sure the following settings are configured:
Host 192.168.*.* StrictHostKeyChecking=no UserKnownHostsFile=/dev/null
Use the following settings to enable and start the service:
sudo systemctl enable sshd.service
sudo systemctl start sshd.service
sudo systemctl status sshd.service
If the service is running normally, you can see the following output from the last command.
● sshd.service - OpenSSH Daemon Loaded: loaded (/usr/lib/systemd/system/sshd.service; enabled; vendor preset: disabled) Active: active (running) since Sat 2018-04-28 19:53:14 AEST; 12min ago Main PID: 3537 (sshd) Tasks: 1 CGroup: /system.slice/sshd.service └─3537 /usr/sbin/sshd -D
Apr 28 19:53:14 hdp-slave-1 systemd[1]: Starting OpenSSH Daemon... Apr 28 19:53:14 hdp-slave-1 sshd-gen-keys-start[3532]: Checking for missing server keys in /etc/ssh Apr 28 19:53:14 hdp-slave-1 systemd[1]: Started OpenSSH Daemon. Apr 28 19:53:14 hdp-slave-1 sshd[3537]: Server listening on :: port 22. Apr 28 19:53:14 hdp-slave-1 sshd[3537]: Server listening on 0.0.0.0 port 22.
You can also use the following command to check whether port 22 is being listened:
netstat -an | grep :22 tcp 0 0 0.0.0.0:22 0.0.0.0:* LISTEN tcp 0 0 :::22 :::* LISTEN
Enable firewall
Open Yast and firewall configuration:
# yast firewall
Goto "Allowed Services" and add "Secure Shell Server". Save and quit Yast and try to connect.
You can also configure it through UI (if enabled):
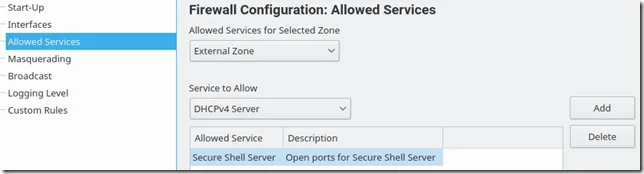
This needs to be done in both servers.
To verify whether the firewall rule is created, you can use the following command to verify:
hadoop@hdp-slave-1:/home/tangf>sudo iptables -nL | grep 22 [sudo] password for root: LOG tcp -- 0.0.0.0/0 0.0.0.0/0 limit: avg 3/min burst 5 tcp dpt:22 flags:0x17/0x02 LOG flags 6 level 4 prefix "SFW2-INext-ACC-TCP " ACCEPT tcp -- 0.0.0.0/0 0.0.0.0/0 tcp dpt:22
Generate ssh key
Sudo to hadoop in hdp-master server and generate a SSH key using the following command:
tangf@hdp-master:
> su hadoop Password: hadoop@hdp-master:/home/tangf> cd ~ hadoop@hdp-master:~> pwd /home/hadoop hadoop@hdp-master:> ssh-keygen Generating public/private rsa key pair. Enter file in which to save the key (/home/hadoop/.ssh/id_rsa): /home/hadoop/.ssh/hdp-key Enter passphrase (empty for no passphrase): Enter same passphrase again: Your identification has been saved in hdp-key. Your public key has been saved in hdp-key.pub. The key fingerprint is: SHA256:Ss1tzk7WNdxNqSmhgECtVZPHcPgnBJ+f/fJRialaikw hadoop@hdp-master The key's randomart image is: +---[RSA 2048]----+ | .o. .=*. | | .o.o++. .| | o. .+o . ..| | . o.+o.+.=oo| | . S.=+ *+.+| | . . + .o....| | .E =o.. o | | o .++ o .| | o o. . | +----[SHA256]-----+
Copy the key to other server
Use the following command to copy the public key:
ssh-copy-id -i ~/.ssh/hdp-key.pub hadoop@hdp-slave-1
ssh-copy-id -i ~/.ssh/hdp-key.pub hadoop@hdp-master
Verify
You can verify SSH configuration by running the following command in hdp-master:
hadoop@hdp-master:~> ssh hadoop@hdp-slave-1 -i ~/.ssh/hdp-key Last login: Sat Apr 28 21:17:23 2018 from 192.168.192.133 Have a lot of fun...
The hadoop account in your master server can now directly logon using the hdp-key.
Similarly, you can also login using the key from the slave server:
hadoop@hdp-slave-1:~> ssh hadoop@hdp-master -i ~/.ssh/hdp-key Last login: Sat Apr 28 21:20:06 2018 from 192.168.192.132 Have a lot of fun...
Till now, you can easily use public key authentication to establish ssh connection.
Configure environment variables
Follow the steps below to configure environment variables in both servers.
Use the following command to edit bash profile:
vi ~/.profile
Add the following lines:
export PATH=${PATH}:/hadoop/hadoop-3.1.0/bin export HADOOP_HOME=/hadoop/hadoop-3.1.0
Apply the same changes to file ~/.bashrc and then run the following commands to apply these changes:
$ source ~/.bashrc $ source ~/.profile
Install Hadoop in master server
Download and unzip
In the master server, download and install Hadoop 3.1.0 using the following commands:
mkdir /hadoop
cd /hadoop
wget http://apache.melbourneitmirror.net/hadoop/common/hadoop-3.1.0/hadoop-3.1.0.tar.gz
tar -xvf hadoop-3.1.0.tar.gz
chown -R hadoop /hadoop
Run the following commands to verify:
su hadoop
cd /hadoop/hadoop-3.1.0/bin
hadoop@hdp-master:/hadoop/hadoop-3.1.0/bin>./hadoop version Hadoop 3.1.0 Source code repository https://github.com/apache/hadoop -r 16b70619a24cdcf5d3b0fcf4b58ca77238ccbe6d Compiled by centos on 2018-03-30T00:00Z Compiled with protoc 2.5.0 From source with checksum 14182d20c972b3e2105580a1ad6990 This command was run using /hadoop/hadoop-3.1.0/share/hadoop/common/hadoop-common-3.1.0.jar
And now we need to configure Hadoop configuration files as I did in the single node configuration guide.
`Configure hadoop-env.sh`
Change file hadoop-env.sh in ${HADOOP_HOME}/etc/hadoop directory to add the following lines at the end of file:
export HADOOP_CONF_DIR="${HADOOP_HOME}/etc/hadoop" export PATH="${PATH}:${HADOOP_HOME}/bin" export HADOOP_SSH_OPTS="-i ~/.ssh/hdp-key"
The last environment variable is important because we used a different key name instead of the default ones. Without this, ssh connection cannot be established without interactive password input.
Configure HDFS - core-site.xml
* All the XML files in the following steps are located in ${HADOOP_HOME}/etc/hadoop folder unless specified.
Make sure the following configurations are existing:
<configuration> <property> <name>fs.default.name</name> <value>hdfs://hdp-master:19000</value> </property> </configuration>
Configure HDFS - hdfs-site.xml
Run the following command to create a dfs folder and sub folders.
hadoop@hdp-master:/hadoop> mkdir dfs hadoop@hdp-master:/hadoop> cd dfs hadoop@hdp-master:/hadoop/dfs> mkdir namespace_logs hadoop@hdp-master:/hadoop/dfs> mkdir data
Make sure the following configurations are existing (you can change the file path to your own paths):
<configuration> <property> <name>dfs.replication</name> <value>2</value> </property> <property> <name>dfs.namenode.name.dir</name> <value>/hadoop/dfs/namespace_logs</value> </property> <property> <name>dfs.datanode.data.dir</name> <value>/hadoop/dfs/data</value> </property> </configuration>
The above configurations setup the HFDS locations for storing namespace, logs and data files. There will be 2 copies of all data in the file system.
Configure HDFS - workers
Edit file workers to ensure the following content exists:
hdp-master hdp-slave-1
Configure MapReduce - mapred-site.xml
Edit file mapred-site.xml and add the following configuration:
<configuration> <property> <name>mapreduce.job.user.name</name> <value>hadoop</value> </property> <property> <name>yarn.resourcemanager.address</name> <value>hdp-master:8032</value> </property>
<property>
<name>mapreduce.framework.name</name>
<value>yarn</value>
</property> <property> <name>yarn.app.mapreduce.am.env</name> <value>HADOOP_MAPRED_HOME=/hadoop/hadoop-3.1.0</value> </property> <property> <name>mapreduce.map.env</name> <value>HADOOP_MAPRED_HOME=/hadoop/hadoop-3.1.0</value> < /property> < property> <name>mapreduce.reduce.env</name> <value>HADOOP_MAPRED_HOME=/hadoop/hadoop-3.1.0</value> < /property>
</configuration>
Configure YARN - yarn-site.xml
Edit file yarn-site.xml and make sure the following entries exist:
<configuration> <property> <name>yarn.resourcemanager.hostname</name> <value>hdp-master</value> </property> <property> <name>yarn.server.resourcemanager.application.expiry.interval</name> <value>60000</value> </property>
<property> <name>yarn.nodemanager.aux-services</name> <value>mapreduce_shuffle</value> </property>
<property> <name>yarn.nodemanager.aux-services.mapreduce.shuffle.class</name> <value>org.apache.hadoop.mapred.ShuffleHandler</value> </property>
<property> <name>yarn.log-aggregation-enable</name> <value>true</value> </property>
<property> <name>yarn.log-aggregation.retain-seconds</name> <value>-1</value> </property>
<property> <name>yarn.application.classpath</name> <value>$HADOOP_CONF_DIR,${HADOOP_COMMON_HOME}/share/hadoop/common/*,${HADOOP_COMMON_HOME}/share/hadoop/common/lib/*,${HADOOP_HDFS_HOME}/share/hadoop/hdfs/*,${HADOOP_HDFS_HOME}/share/hadoop/hdfs/lib/*,${HADOOP_MAPRED_HOME}/share/hadoop/mapreduce/*,${HADOOP_MAPRED_HOME}/share/hadoop/mapreduce/lib/*,${HADOOP_YARN_HOME}/share/hadoop/yarn/*,${HADOOP_YARN_HOME}/share/hadoop/yarn/lib/*</value> </property> </configuration>
In the above example, are will use all the default port numbers for YARN:
| Address | Port |
|---|---|
| Resource manager web app address | 8088 |
| Resource manager secured web app address | 8090 |
| Resource tracker address | 8031 |
| Resource manager admin address | 8033 |
Install Hadoop in slave server
Create folder
Run the following command in the slave server (if no permission can sudo to root user)
mkdir /hadoop
cd /hadoop
chown -R hadoop /hadoop
Install Hadoop on the salve server hdp-slave-1 by running the folllowing commands in master server (hdp-master):
su hadoop
cd /
scp -rv -i "~/.ssh/hdp-key" /hadoop hadoop@hdp-slave-1:/
scp command is used to copy the /hadoop folder from master to slave server.
Sync configuration files
The following command can be used to sync configuration files:
scp -rv -i "~/.ssh/hdp-key" /hadoop/hadoop-3.1.0/etc hadoop@hdp-slave-1:/hadoop/hadoop-3.1.0/
Format name mode in master
Run the following command to format name node:
tangf@hdp-master:/> su hadoop Password: hadoop@hdp-master:/> cd /hadoop/hadoop-3.1.0/ hadoop@hdp-master:/hadoop/hadoop-3.1.0> bin/hadoop namenode -format
Make sure there is no errors when initializing.
Start Hadoop
Start HDFS
Since we have configured passwordless ssh between our master and slave servers, we can just use the following command to start HDFS daemons:
$HADOOP_HOME/sbin/start-dfs.sh
Verify through WebUI
Web URL for DFS health reports: http://hdp-master:9870/dfshealth.html#tab-overview
You should be able to see two live nodes:
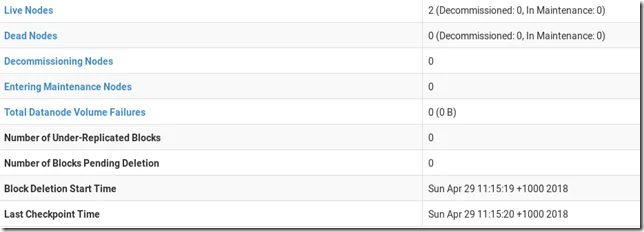

The two data nodes’ URLs are:
Verify through command line
hadoop@hdp-master:/hadoop/hadoop-3.1.0/etc/hadoop> hdfs dfsadmin -report Configured Capacity: 39248199680 (36.55 GB) Present Capacity: 16996110336 (15.83 GB) DFS Remaining: 16996085760 (15.83 GB) DFS Used: 24576 (24 KB) DFS Used%: 0.00% Replicated Blocks: Under replicated blocks: 0 Blocks with corrupt replicas: 0 Missing blocks: 0 Missing blocks (with replication factor 1): 0 Pending deletion blocks: 0 Erasure Coded Block Groups: Low redundancy block groups: 0 Block groups with corrupt internal blocks: 0 Missing block groups: 0 Pending deletion blocks: 0
Live datanodes (2):
Name: 192.168.192.132:9866 (hdp-master) Hostname: hdp-master Decommission Status : Normal Configured Capacity: 19320012800 (17.99 GB) DFS Used: 12288 (12 KB) Non DFS Used: 14309150720 (13.33 GB) DFS Remaining: 4641357824 (4.32 GB) DFS Used%: 0.00% DFS Remaining%: 24.02% Configured Cache Capacity: 0 (0 B) Cache Used: 0 (0 B) Cache Remaining: 0 (0 B) Cache Used%: 100.00% Cache Remaining%: 0.00% Xceivers: 1 Last contact: Sun Apr 29 11:50:48 AEST 2018 Last Block Report: Sun Apr 29 11:47:33 AEST 2018 Num of Blocks: 0
Name: 192.168.192.133:9866 (hdp-slave-1) Hostname: hdp-slave-1 Decommission Status : Normal Configured Capacity: 19928186880 (18.56 GB) DFS Used: 12288 (12 KB) Non DFS Used: 7210156032 (6.71 GB) DFS Remaining: 12354686976 (11.51 GB) DFS Used%: 0.00% DFS Remaining%: 62.00% Configured Cache Capacity: 0 (0 B) Cache Used: 0 (0 B) Cache Remaining: 0 (0 B) Cache Used%: 100.00% Cache Remaining%: 0.00% Xceivers: 1 Last contact: Sun Apr 29 11:50:46 AEST 2018 Last Block Report: Sun Apr 29 11:47:40 AEST 2018 Num of Blocks: 0
Start YARN
Similarly, YARN can be started using the following command:
$HADOOP_HOME/sbin/yarn-dfs.sh
Verify through resource manager web UI
Web URL for resource manager: http://hdp-master:8088/cluster
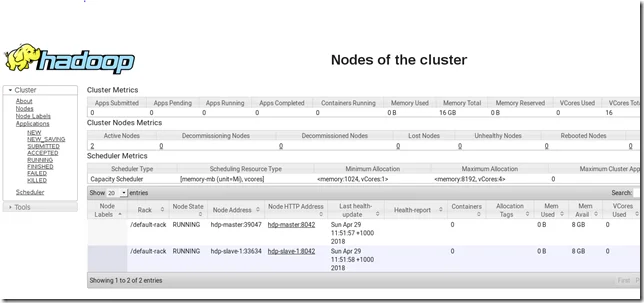
You should be able to see two live nodes:
| Rack | Node Address | Node HTTP Address |
|---|---|---|
| /default-rack | hdp-master:39047 | hdp-master:8042 |
| /default-rack | hdp-slave-1:33634 | hdp-slave-1:8042 |
Stop DFS and YARN
The services can be stopped through the following command lines:
$HADOOP_HOME/sbin/stop-yarn.sh
$HADOOP_HOME/sbin/stop-dfs.sh
Refer to the References section for more details about all the available CLIs.
Verify Hadoop cluster
Let’s verify the cluster by loading some data into HDFS.
The following are the commands (and output):
tangf@hdp-master:/> su hadoop Password: hadoop@hdp-master:/> cd /hadoop hadoop@hdp-master:/hadoop> wgethttps://app.kontext.tech/Syndication/RSS.xml --2018-04-29 12:10:58-- https://app.kontext.tech/Syndication/RSS.xml Resolving app.kontext.tech (app.kontext.tech)... 13.75.147.201 Connecting to app.kontext.tech (app.kontext.tech)|13.75.147.201|:80... connected. HTTP request sent, awaiting response... 200 OK Length: 212668 (208K) [application/rss+xml] Saving to: ‘RSS.xml’
100%[============================================================================================================================================================================================>] 212,668 --.-K/s in 0.1s
2018-04-29 12:10:59 (1.88 MB/s) - ‘RSS.xml’ saved [212668/212668]
hadoop@hdp-master:/hadoop> hdfs dfs -put RSS.xml / hadoop@hdp-master:/hadoop> hdfs dfs -ls / Found 1 items -rw-r--r-- 2 hadoop supergroup 212668 2018-04-29 12:13 /RSS.xml
In DFS admin website, you can also find the file:
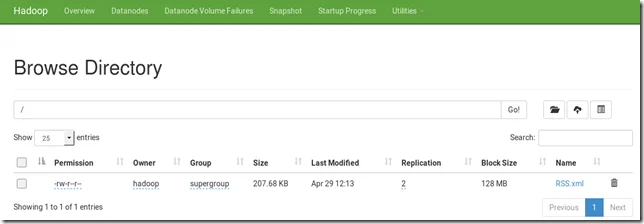
As shown in the above screen, the file replication is 2 based on our previous configurations.
You can also extend the cluster by adding more nodes.
Have fun with your Hadoop cluster! You can comment here if you encounter any issues or have any questions.
Debug issues
HDFS port
If you encounter similar issues like the following, it indicates the two data nodes cannot communicate with each other (usually because of network issue, for example, firewall).
2018-04-29 00:42:42,067 INFO org.apache.hadoop.ipc.Client: Retrying connect to server: hdp-master/192.168.192.132:19000. Already tried 33 time(s); maxRetries=45
For my case, I changed network interface to Internal Zone which solves this issue.
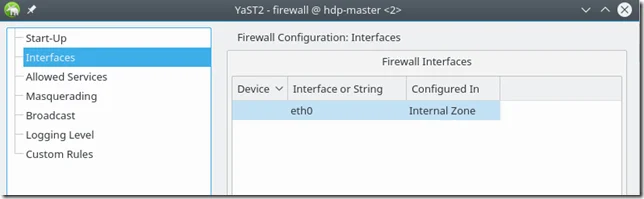
Alternatively, you need to configure firewall rules for all the ports required by Hadoop as we did previously for SSH port 22.
YARN resource manager issue
This means your data node manager cannot connect to the resource manager.
2018-04-29 11:29:53,440 INFO org.apache.hadoop.ipc.Client: Retrying connect to server: 0.0.0.0/0.0.0.0:8031. Already tried 9 time(s); retry policy is RetryUpToMaximumCountWithFixedSleep(maxRetries=10, sleepTime=1000 MILLISECONDS)
To fix this issue, make sure your YARN configuration is correct:
<property> <name>yarn.resourcemanager.hostname</name> <value>hdp-master</value> </property>