ASP.NET Core provides unobtrusive client validation feature to validate data inputs in browsers before sending back to server for validation. This article shows you how to customize client validation attributes. For example, you can customize to replace data-val-* with different names based on your client validation framework.
How client validation is done?
Client side validation in ASP.NET Core Razor is usually done via the following steps:
- Define an input model class.
- Add validation attributes to the model attributes.
- Render the model attributes in view engines like Razor and also add data attributes to the HTML elements that are required by the client frameworks.
- Client validation framework, for example jQuery validation, can then use the data attributes to validate users' input.
An example
The following is one example with implementation details.
For an application login page, we can define a model with the following content:
public class InputModel
{
[Required(ErrorMessage = Data.ModelValidationMessages.Required)]
[EmailAddress(ErrorMessage = Data.ModelValidationMessages.Email)]
[Display(Name = Data.ModelFieldDisplayNames.Email)]
public string Email { get; set; }

[Required(ErrorMessage = Data.ModelValidationMessages.Required)]
[DataType(DataType.Password)]
[Display(Name = Data.ModelFieldDisplayNames.Password)]
public string Password { get; set; }

[Display(Name = Data.ModelFieldDisplayNames.RememberMe)]
public bool RememberMe { get; set; }
}
There are two validation attributes used:
RequiredAttribute- Mark the field as mandatory.EmailAddressAttribute- Mark the field as email address, i.e. users can only input valid email address.
Then this model is used in a Razor Page model class which display these attributes using the following code in the view:
<div class="form-floating mb-3">
<input asp-for="Input.Email" class="form-control" placeholder="@S["Email"]" />
<label asp-for="Input.Email"></label>
<span asp-validation-for="Input.Email" class="text-danger"></span>
</div>
<div class="form-floating mb-3">
<input asp-for="Input.Password" class="form-control" placeholder="@S["Password"]" />
<label asp-for="Input.Password"></label>
<span asp-validation-for="Input.Password" class="text-danger"></span>
</div>
<div class="mb-3">
<div class="form-check">
	<label class="form-check-label" asp-for="Input.RememberMe">@Html.DisplayNameFor(model => model.Input.RememberMe)</label>
	<input class="form-check-input" type="checkbox" asp-for="Input.RememberMe" />
</div>
</div>
It renders the following HTML:
<div class="form-floating mb-3">
<input class="form-control" placeholder="Email" type="email" data-val="true" data-val-email="Please enter a valid email address." data-val-required="Please input Email." id="Input_Email" name="Input.Email" value="">
<label for="Input_Email">Email</label>
<span class="text-danger field-validation-valid" data-valmsg-for="Input.Email" data-valmsg-replace="true"></span>
</div>
<div class="form-floating mb-3">
<input class="form-control" placeholder="Password" type="password" data-val="true" data-val-required="Please input Password." id="Input_Password" name="Input.Password">
<label for="Input_Password">Password</label>
<span class="text-danger field-validation-valid" data-valmsg-for="Input.Password" data-valmsg-replace="true"></span>
</div>
<div class="mb-3">
<div class="form-check">
	<label class="form-check-label" for="Input_RememberMe">Remember me?</label>
	<input class="form-check-input" type="checkbox" data-val="true" data-val-required="The Remember me? field is required." id="Input_RememberMe" name="Input.RememberMe" value="true">
</div>
</div>
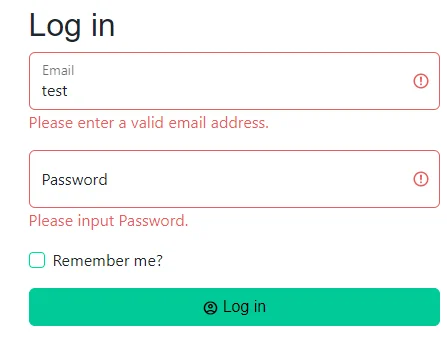
As you can see, data attributes like data-val-* are added. These attributes are then utilized by client JavaScript framework like jQuery Validation to decide how to validate and to display error messages when the input is not valid.
And the page looks like the following screenshot:

Client validation attributes adapter provider
You will be wondering how ASP.NET Razor Pages add these client validation data attributes. The answer is interface IValidationAttributeAdapterProvider. By default, ASP.NET Core has implemented a provider for all the built-in validation attributes named ValidationAttributeAdapterProvider. You can find the source code of this class on GitHub.
By looking into the source code, you will understand that the provider will simply instantiate the corresponded attribute adapter based on attribute type. For example, if the attribute is RequiredAttribute, it will return RequiredAttributeAdapter class.
else if (typeof(RequiredAttribute).IsAssignableFrom(type))
{
	return new RequiredAttributeAdapter((RequiredAttribute)attribute, stringLocalizer);
}
In each of the attribute adapter class, it defines how client attributes are merged into main HTML element attributes as the following code snippet shows:
/// <inheritdoc />
public override void AddValidation(ClientModelValidationContext context)
{
if (context == null)
{
	throw new ArgumentNullException(nameof(context));
}

MergeAttribute(context.Attributes, "data-val", "true");
MergeAttribute(context.Attributes, "data-val-required", GetErrorMessage(context));
}
As you can see, RequiredAttribute will generate two attribtues:
data-val: mark validation as required for the field.data-val-required: error messages when user doesn't input the value for the field.
For different adapters, different client data attributes will be added. Refer to GitHub source code to understand more if you are interested.
Customize validation attributes
Now you've understood the mechanism of client validation in ASP.NET Core MVC. To customize these attributes, we just need to implement our own adapter provider and then register it as singleton instance.
Create a custom validation adapter
The following code snippet create a customized validation adatper for RequriedAttribute.
using Microsoft.AspNetCore.Mvc.ModelBinding.Validation;
using Microsoft.Extensions.Localization;

namespace MyNamespace;

/// <summary>
/// <see cref="AttributeAdapterBase{TAttribute}"/> for <see cref="RequiredAttribute"/>.
/// </summary>
public sealed class CustomRequiredAttributeAdapter : AttributeAdapterBase<RequiredAttribute>
{
    /// <summary>
    /// Initializes a new instance of <see cref="CustomRequiredAttributeAdapter"/>.
    /// </summary>
    /// <param name="attribute">The <see cref="RequiredAttribute"/>.</param>
    /// <param name="stringLocalizer">The <see cref="IStringLocalizer"/>.</param>
    public CustomRequiredAttributeAdapter(RequiredAttribute attribute, IStringLocalizer? stringLocalizer)
        : base(attribute, stringLocalizer)
    {
    }

    /// <inheritdoc />
    public override void AddValidation(ClientModelValidationContext context)
    {
        if (context == null)
        {
            throw new ArgumentNullException(nameof(context));
        }

        MergeAttribute(context.Attributes, "data-custom-val", "true");
        MergeAttribute(context.Attributes, "data-custom-val-required", GetErrorMessage(context));
    }

    /// <inheritdoc />
    public override string GetErrorMessage(ModelValidationContextBase validationContext)
    {
        if (validationContext == null)
        {
            throw new ArgumentNullException(nameof(validationContext));
        }

        return GetErrorMessage(validationContext.ModelMetadata, validationContext.ModelMetadata.GetDisplayName());
    }
}
Compared with the built-in one, the client data attribute names are renamed to data-custom-val and data-custom-val-required accordingly.
Create a custom validation attribute adapter provider
Now we can create a customized validation attribute adapter provider to utilize the custom validation attribute adapter.
The following code snippet provides one example of doing that:
public class CustomValidationAttributeAdapterProvider : IValidationAttributeAdapterProvider
{
    private readonly IValidationAttributeAdapterProvider baseProvider = new ValidationAttributeAdapterProvider();

    public IAttributeAdapter GetAttributeAdapter(ValidationAttribute attribute, IStringLocalizer stringLocalizer)
    {
        if (attribute is RequiredAttribute)
            return new CustomRequiredAttributeAdapter(attribute as RequiredAttribute, stringLocalizer);
        else
            return baseProvider.GetAttributeAdapter(attribute, stringLocalizer);
    }
}
You can add other logic into GetAttribtueAdapter method accordingly.
Register the provider
The last step is to register the client adapter provider in Startup.cs or Program.cs.
services.AddSingleton<IValidationAttributeAdapterProvider, CustomValidationAttributeAdapterProvider>();
Then all the Razor Pages will begin to use this new custom adapter provider to merge client validation attributes.
Summary
I hope you now understand the details of customizing client validation with ASP.NET Core. You can use this approach to implement your own validator and also to customize data attributes to work with your own client validation framework with or without jQuery Validation. There are a number of vanilla JavaScript based client validation framework, for example validator.js, pristine, etc. that can be used.