This article provides step-by-step guidance to install Hadoop 3.3.0 on macOS. Hadoop 3.3.0 was released on July 14 2020. It is the first release of Apache Hadoop 3.3 line. There are significant changes compared with Hadoop 3.2.0, such as Java 11 runtime support, protobuf upgrade to 3.7.1, scheduling of opportunistic containers, non-volatile SCM support in HDFS cache directives, etc.
Install Java JDK
Follow page Install JDK 11 on macOS to setup JDK SE 11 on your macOS.
Download Hadoop binary
Go to release page of Hadoop website to find a download URL for Hadoop 3.3.0:
For me, the closest mirror is:
http://mirror.intergrid.com.au/apache/hadoop/common/hadoop-3.3.0/hadoop-3.3.0.tar.gz
Save the file to user home folder. Wait until the download is completed.
Unzip Hadoop binary
Run the following command to create a hadoopfolder under user home folder:
mkdir ~/hadoop
And then run the following command to unzip the binary package:
tar -xvzf hadoop-3.3.0.tar.gz -C ~/hadoop
Once it is unpacked, change the current directory to the Hadoop folder:
cd ~/hadoop/hadoop-3.3.0/
Configure passphraseless ssh
This step is critical and please make sure you follow the steps.
Make sure you can SSH to localhost in macOS:
ssh localhost
If you cannot ssh to localhost without a passphrase, run the following command to initialize your private and public keys:
ssh-keygen -t rsa -P '' -f ~/.ssh/id_rsa
cat ~/.ssh/id_rsa.pub >> ~/.ssh/authorized_keys
chmod 0600 ~/.ssh/authorized_keys
Configure the pseudo-distributed mode (Single-node mode)
Now, we can follow the official guide to configure a single node:
- Setup environment variables (optional)
Setup environment variables by editing file ~/.bashrc.
vi ~/.bashrc
Add the following environment variables:
export JAVA_HOME=/Library/Java/JavaVirtualMachines/jdk-11.0.9.jdk/Contents/Home
export HADOOP_HOME=~/hadoop/hadoop-3.3.0
export PATH=$PATH:$HADOOP_HOME/bin
export HADOOP_CONF_DIR=$HADOOP_HOME/etc/hadoop
infoFollow this article to find out how to find your JDK location on your macOS system: Find JAVA_HOME JDK Location on macOS. Remember to update the JAVA_HOME variable accordingly.
Run the following command to source the latest variables:
source ~/.bashrc
- Edit etc/hadoop/hadoop-env.sh file:
vi etc/hadoop/hadoop-env.sh
Set a JAVA_HOME environment variable:
export JAVA_HOME=/Library/Java/JavaVirtualMachines/jdk-11.0.9.jdk/Contents/Home
- Edit etc/hadoop/core-site.xml:
vi etc/hadoop/core-site.xml
Add the following configuration:
<configuration>     <property>         <name>fs.defaultFS</name>         <value>hdfs://localhost:9000</value>     </property>
</configuration>
- Edit etc/hadoop/hdfs-site.xml:
vi etc/hadoop/hdfs-site.xml
Add the following configuration:
<configuration>     <property>         <name>dfs.replication</name>         <value>1</value>     </property>
</configuration>
- Edit file etc/hadoop/mapred-site.xml:
vi etc/hadoop/mapred-site.xml
Add the following configuration:
<configuration>     <property>         <name>mapreduce.framework.name</name>         <value>yarn</value>     </property>     <property>         <name>mapreduce.application.classpath</name>         <value>$HADOOP_MAPRED_HOME/share/hadoop/mapreduce/*:$HADOOP_MAPRED_HOME/share/hadoop/mapreduce/lib/*</value>     </property>
</configuration>
- Edit file etc/hadoop/yarn-site.xml:
vi etc/hadoop/yarn-site.xml
Add the following configuration:
<configuration>
    <property>
        <name>yarn.nodemanager.aux-services</name>
        <value>mapreduce_shuffle</value>
    </property>
    <property>
        <name>yarn.nodemanager.env-whitelist</name>
        <value>JAVA_HOME,HADOOP_COMMON_HOME,HADOOP_HDFS_HOME,HADOOP_CONF_DIR,CLASSPATH_PREPEND_DISTCACHE,HADOOP_YARN_HOME,HADOOP_MAPRED_HOME</value>
    </property>
</configuration>
Format namenode
Run the following command to format the name node:
bin/hdfs namenode -format
Run DFS daemons
- Run the following commands to start NameNode and DataNode daemons:
sbin/start-dfs.sh
bash-3.2$ sbin/start-dfs.sh
Starting namenodes on [localhost]
Starting datanodes
Starting secondary namenodes [***]
2020-12-22 21:45:41,865 WARN util.NativeCodeLoader: Unable to load native-hadoop library for your platform... using builtin-java classes where applicable
- Check status via jpscommand:
$ jps
2085 NameNode
2407 Jps
2183 DataNode
2314 SecondaryNameNode
When the services are initiated successfully, you should be able to see these four processes.
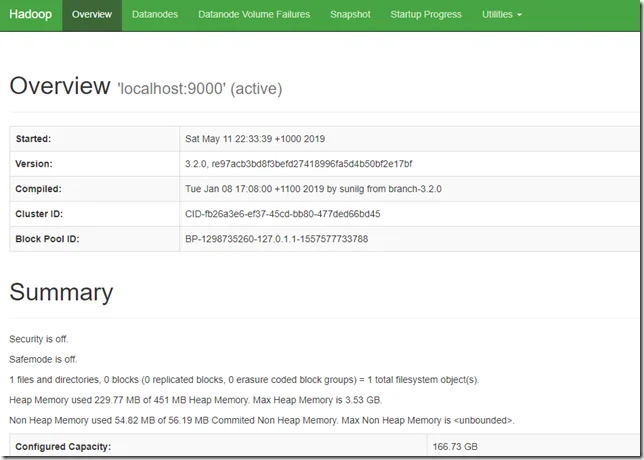
- View name node portal
You can view the name node through the following URL:
The web UI looks like the following:

You can also view the data nodes information through menu link Datanodes:

Run YARN daemon
- Run the following command to start YARN daemon:
sbin/start-yarn.sh
sbin/start-yarn.sh
Starting resourcemanager
Starting nodemanagers
- Check status via jpscommand
jps
2560 ResourceManager
2085 NameNode
2183 DataNode
2728 Jps
2314 SecondaryNameNode
2654 NodeManager
Once the services are started, you can see two more processes for NodeManagerand ResourceManager.
- View YARN web portal
You can view the YARN resource manager web UI through the following URL:
The web UI looks like the following:

You can view all the applications through this web portal.
Shutdown services
Once you've completed explorations, you can use the following command to shutdown those daemons:
sbin/stop-yarn.sh
sbin/stop-dfs.sh
You can verify through jps command which will only show one process now:
jps
3441 Jps
Summary
Congratulations! Now you have successfully installed a single node Hadoop 3.3.0 cluster on your macOS system.
Have fun with Hadoop 3.3.0 on macOS!